


Document Actions
gvSIG-Desktop 1.9 Alpha. Manual de usuario.
The Geolocation tool provides the ability to change the related transformation that is applied to a raster in its display. A raster could have coordinates that place it in a geographical position. This geographic location is only a change of position, scale and rotation of the image relative to an original position. These changes in position, scale and rotation are those that can be changed with this tool. This can be done numerically and by visual approximation.
This tool does not provide capabilities to deal with complex projections and georeferencing involving the need for resampling.
To launch the geolocation dialogue of the layer, the drop-down toolbar is used by selecting "Geographical Transformations" on the left button and "Geolocation" on the dropdown button on the right. Make sure that the text shows the name of the layer to which we like to assign the transformation.

Geolocation Tool
Upon activating the geolocation tool on a raster layer, a small dialog will appear floating on the view with a series of text entries and a button bar. Also the raster layer that has been selected acquires the capacity to be moved, rotated or moved by clicking and dragging it to the right place on the view.
Transformation on the view
- Translation: When the geolocation tool is active you can move the mouse over the image on the screen and the cursor changes to a hand. This indicates that we can move by clicking and dragging on the raster view.
- Scaling: When the geolocation tool is active you can move the mouse over the edges of the image on screen and the mouse cursor will change. Depending on the chosen edge the cursor will take one form or another. If placed in the top or bottom borders the cursor will become a vertical arrow. This indicates that we can click and drag to scale the image from one side only. The scaling at all times keep the proportions of the raster. If we move the cursor around the side edges the pointer becomes a horizontal arrow now allowing us to scale laterally. In the case of the corners the cursor appears as an oblique arrow.
- Rotation: When the geolocation tool is active, we can move the mouse over the outer corners of the image and the cursor will change. This will appear as a circular arrow. This indicates that we can begin to rotate the raster from the selected corner.
- Shear: When the geolocation tool is active you can move your mouse over the outer side edges of the image and the mouse cursor will change. This will appear as an arrow with a symbol X or Y depending on whether the mouse is in the horizontal or vertical edges respectively. This indicates that we can begin to warp the raster in the direction of the X or the Y.
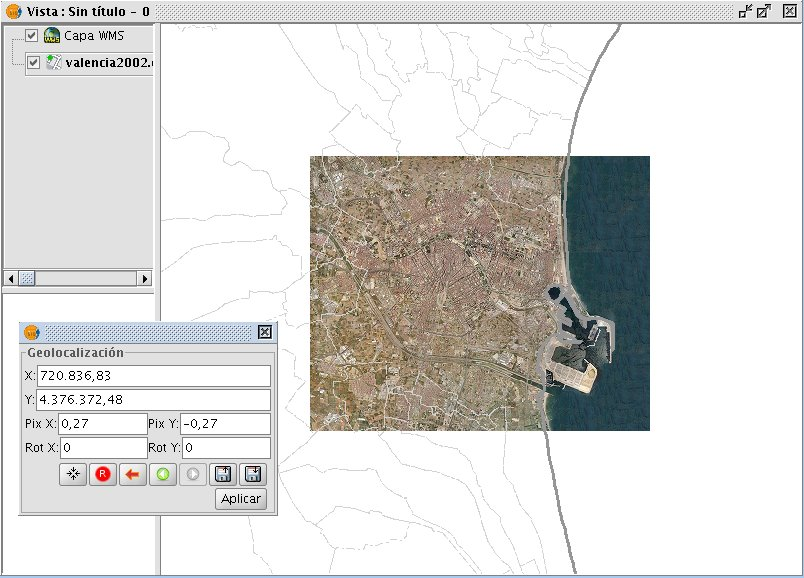
Vista Panel Image Geolocation
Transformation by introducing coordinates
From the geolocation floating box we can modify the transformation of the image on the view. The text entries marked as X, Y, Pix X, Pix Y, Rot X, Rot Y contain the current position in upper left X coordinate, upper left Y coordinate, pixel size in X, pixel size in Y, rotation in X and rotation in Y respectively. If we change these values from the keyboard these will be updated on the image by pressing the "Enter" key while the cursor is inside the text box or when it loses focus.
Controls of the geolocation box
Centering the raster layer in the view: With this button we center the raster in the current view regardless of zoom it has selected. The coordinates will be automatically calculated.
- Initialize the raster transformation: Resets all the transformations that have been applied to the cells back to the default.
- Go to the first processing: Assign the first transformation that was applied.
- Go to the previous transformation: Assign the previous transformation to the current that was applied.
- Go to the next transformation: Assigns the following to the current transformation.
- Upload georeferencing from tfw file: If we have a tfw file with georeferencing coordinates, these can be loaded with this option. A dialog to select the file you want will show up. The extension of the file must be tfw or wld.
- Save current transformation as the default for the raster: Applying this option saves the currently active transformation in the file .rmf attached to raster. Next time the raster is loaded will be with that transformation.


